Mr. Tu, Nguyen Duc
ẢO HÓA
How to combine license keys in My VMware (2006973)
Purpose
Details
Important notes
:- You can combine license keys that are in the same folder to create a single key in the same folder.
- You cannot combine license keys of different editions or for different products, and you cannot combine license keys that are in different folders.
-
Super Users, Procurement Contacts, and users with the Divide & Combine License Keys permissions can combine license keys.
- Log in to My VMware.
- Select Manage License Keys from the navigation bar at the top.
- Select Combine License Keys from the dropdown:
- Select a folder.

Note: You cannot combine license keys from different folders.
- If you have a large number of products or license keys, you can use the By Products tab. To filter products within particular folders, click the Folders dropdown and select a folder. Click Apply.

- Select a product.
- Select two or more license keys to combine into one license key.
- Click Continue.
- Indicate that you have read and understand the warning, then click Confirm.
The change takes place immediately. An alert is generated when the action is complete.
Di chuyển các máy chủ ảo (VM) khi đang tồn tại snapshots
1. Có 3 lựa chọn cho việc di chuyển 1 VM:
- Cold Migration:
- Thực hiện thay đổi lại vị trí của thư mục và toàn bộ các file chứa trong thư mục của 1 máy VM từ datastore này sang datastore khác. Hoặc thay đổi đăng ký thông tin từ host này sang host khác
- Đăng ký VM lại với Inventory.
- Chỉ được thực hiện khi VM đã được poweroff.
- vMotion: Là việc thực hiện di chuyển VM từ host này sang host khá, đồng thời tự động đăng ký lại khi VM đang ở trong trạng thái running.
- Storage vMotion:
- Thực hiện thay đổi lại vị trí của thư mục và toàn bộ các file chứa trong thư mục của 1 máy VM từ datastore này sang datastore khác.
- Được thực hiện khi VM đang running (poweron)
2. Ảnh hưởng của snapshots
vMotion
Trong trường hợp này, tất cả các sanpshot sẽ được giữa lại khi máy chủ VM được vMotion..
Cold Migration
Trong trường hợp này, tất cả các snapshot cùng với file cấu hình .vmx cũng được di chuyển theo.
Khi một VM di chuyển từ ESX hosts này sang hosts khác mà không thay đổi về datastores thì các file của VM cũng không thay đổi.
Storage vMotion
- Đối với các phiên bản ESX/ESXi 3.x và ESX/ESXi 4.x, không thể thực hiện di chuyển VM cho đến khi bạn phải thực hiện xóa hết snapshots hoặc poweroff VM.
- Đối với các phiên bản ESXi 5.0 và 6.0 trở về sau này, việc di chuyển VM chứa snapshot đã được hỗ trợ.
Note: vMotion is supported in AppVols 2.10 and later. svMotion is not supported in View or AppVols.
Migrating vCenter Server 5.5 to vCenter Server Appliance 6.0 U2m (2146439)
- Should I install or upgrade to vSphere 6.0 Update 2m? This release is specifically targeted for customers who want to migrate from a Windows vCenter Server 5.5 to the vCenter Server Appliance. Installing and upgrading is not supported with this release as it is same underlying code base as vSphere 6.0 Update 2. The m in Update 2m denotes Migration.
- How does the vCenter Server Appliance Migration Tool work?
Click here to view the video for a quick overview of the migration process. For more information, see the vSphere Migration guide.
- What versions of vSphere is supported for the Source Windows vCenter Server?
Only vSphere 5.5 Update 3d and earlier. If you are running vSphere 5.0 or 5.1, upgrading to vSphere 5.5 is required before migrating. Both physical and virtual vCenter Server 5.5 installations are fully supported with the vCenter Server Appliance Migration Tool.
- Is vSphere 6.0 supported migration?
No, vSphere is currently not supported for migration. This will be supported in a future release.
- Can I migrate to the vCenter Server Appliance but not upgrade to vSphere 6.0? No, the vCenter Server Appliance Migration includes both the Migration and Upgrade. These two operations are tied together and cannot be separated.
- Can I still migrate if I have my vCenter Server components (vSphere Web Client, vCenter Server, Inventory Service & Single Sign-On Server) distributed across multiple Windows system? Yes, the vCenter Server Appliance Migration Tool will support these different deployment topologies as part of the migration. The Migration Assistant only needs to run on the vCenter Server and SSO Server if the components are distributed. It is important to note the Migration Assistant will provide either a warning or an error message depending on the extension(s) installed on the vSphere Single Sign-On Server. A warning will be displayed for installed stateless extensions such as the vSphere Web Client and vSphere ESXi Dump Collector, but the migration process can proceed. The Migration Assistant will report an error when stateful extensions such as the vCenter Inventory Service, Auto Deploy, and vSphere Authentication Proxy are installed directly on the vSphere Single Sign-On Server. In this case the migration process cannot proceed until these extensions have been moved off the vSphere Single Sign-On Server.
- Can I change my vCenter Server deployment topology and/or my vSphere SSO Domain as part of the migration? No, the vCenter Server Appliance Migration does NOT modify the topology and/or vSphere SSO Domain configurations of your deployment. You must make these changes either before or after the migration.
- What versions of Microsoft SQL Server are supported for migration? All versions of Microsoft SQL Server (including Express and Embedded) that Windows vCenter Server 5.5 supports.
- What version of Oracle for the Windows vCenter Server Database is supported for migration? All versions that Windows vCenter Server 5.5 currently supports is supported with the VCSA Migration Tool.
- If I have an External Microsoft SQL or Oracle Database for my Source Windows vCenter Server, can I continue to use that after the migration? No, as part of the migration, all data within the vCenter Server Database will be migrated to the Embedded vPostgres Database on the vCenter Server Appliance.
- If I have any additional VMware Products (NSX, vROps, vRA, SRM, Horizon View, and so on) and/or 3rd Party Solutions installed on the same machine as Windows vCenter Server, will they still work after the migration? No, because the Source Windows vCenter Server hostname\IP address is transferred and the machine is powered off as part of the migration. You will need to reinstall and re-register any of the VMware Products and/or 3rd Party Solutions on separate system. If you have vSphere Update Manager (VUM) installed on the Source Windows vCenter Server, see the Moving Update Manager to a New Host Machine When Migrating vCenter Server to vCenter Server Appliance section of the Migration guide.
- What happens to the VMware solutions (NSX, vROps, vRA, SRM, Horizon View, and so on) or Third Party Solutions that was associated with the Source Windows vCenter Server? As long as these solutions are NOT installed on the Source Windows vCenter Server, they will continue to function. Plugin registrations are preserved and migrated to the vCenter Server Appliance during migration. Some solutions may require a service refresh to re-connect to the vCenter Server Appliance after migration. You should verify within each product that their connection to the vCenter Server after migration is still valid.
- Can the vCenter Server Appliance Migration be automated? Yes, you can automate using the vCenter Server Appliance Scripted CLI method just like you would for installation and upgrade. There is an example JSON migration template that is included in the vCenter Server Appliance 6.0 Update 2m ISO. If you have a Physical Source Windows vCenter Server, you will need to manually copy/start the Migration Assistant Tool before you start the automated migration. If your Source Windows vCenter Server is a virtual machine, this step is automated for you as part of the Scripted CLI migration.
- Are custom ports on the Source Windows vCenter Server supported? Only if the custom ports were changed for Net Dumper & Auto Deploy Services. All other custom ports are not supported in the vCenter Server Appliance Migration will display an error if it detects any custom ports and prevent the migration from proceeding. Customers will need to revert back to the default ports if they want to perform a migration.
- Are the vCenter Server IP Address/Hostname, UUID, MoRef ID, vSphere Tags, Custom Attributes, Folders, Permissions, VDS, Self-Signed/Customer SSL Certificates, and so on migrated? Yes, the entire vCenter Server configuration will be migrated over. From a customer and third party solutions consumption standpoint, nothing will change because the exact same vSphere API is available for both Windows vCenter Server and the vCenter Server Appliance.
- Can I keep my original vCenter Server virtual machine Display/Inventory name? No, you will have to provide a new vCenter Server Display/Inventory name, but you can reclaim the original name after the migration process has completed. For example, rename the original vCenter Server Display/Inventory name from vCenter-01 to something like vCenter-01-old before you start the migration. Now, you can now use the original vCenter01 Display/Inventory name during the migration process. By performing the rename before the migration, it prevents the need for a Storage vMotion to rename the underlying virtual machine configuration files to match the display/inventory name.
- Can I change the Hostname or IP Address of my vCenter Server during or after migration? You cannot change the Hostname (FQDN), also referred to as Primary Network Identifier (PNID) before or after migration. You can however, change the IP Address if you are using FQDN by updating your DNS records and then updating the IP Address of your vCenter Server using the Virtual Appliance Management Interface (VAMI) located at https://vcenter_server:5480.
- Are local Windows and/or Single Sign-On (SSO) Users migrated? Local Windows users are NOT migrated, you will need to re-create them if you require such users. Single Sign-On users are migrated as part of the vCenter Server Appliance Migration.
- What happens to the scripts that I have configured to run as a vCenter Server Alarm on the Source Windows vCenter Server? These local scripts on the Source Windows vCenter Server will not be migrated as they will not run on the vCenter Server Appliance. The Alarm definitions will be migrated, but they will not execute correctly as the scripts they are configured to run are for the Windows platform only. You will need to either disable, delete or update these vCenter Server Alarms after the migration.
- Is there a way to retrieve scripts or other information from my Windows vCenter Server after the migration has completed? Yes. However, you will want to either isolate your Windows vCenter Server or change its IP Address because if you power on again, you will cause a conflict with the migrated vCenter Server Appliance.
- What user accounts and permissions do I need to perform migration? You will need the SSO Administrator credentials, vCenter Server or ESXi host credentials for deploying the new vCenter Server Appliance and Windows Administrator credentials of the Windows Server running vCenter Server component(s). If you use a Service Account to run the vCenter Server service, make sure the account has the replace a process level token permission. If the Source Windows vCenter Server is joined to a Microsoft Active Directory Domain, you will also need an account that has permissions to join the vCenter Server Appliance to domain. For more information, see vCenter Server migration displays a failed to join domain warning (2146454).
- If migration fails or if I want to see more details regarding a migration, where can I find the logs?
vCenter Server Appliance Migration Tool UI Logs: %appdata%\Local\VMware\CIP\vcsaInstaller\sessions\session_id\logs
vCenter Server Appliance Migration Tool CLI Logs: %TMPDIR/vcsaCliInstaller-<timestamp>/vcsa-cli-installer.log
vCenter Server Appliance Migration Assistant Logs on Source Windows vCenter Server: %temp%/vcsMigration & %temp%/migration-assistant.log - How do I roll back in case of a failed migration? For information on the rollback process, see Rolling Back a Migration of vCenter Server 5.5 on Windows to vCenter Server Appliance 6.0 U2m or Later (2146453)
- Can I consolidate multiple vCenter Servers during the migration process? No, migrations have a 1:1 relationship between the Source Windows vCenter Server and the destination vCenter Server Appliance
- My Source Windows vCenter Server was deployed using DHCP, is this supported? Yes, DHCP is supported as long as the Source” Windows vCenter Server is not using the DHCP IP Address as its Hostname (FQDN). This means that the DHCP Server should be providing a unique hostname and that it is also resolvable through DNS.
- Is the vSphere 6.0 Update 2m vCenter Server Migration Tool an updated version of the VCS to VCVA converter fling? Yes and no. The Fling was intentionally limited in scope to help get early feedback from customers. The new vCenter Server Appliance Migration Tool has been designed with that feedback in mind and supports the various configurations and topologies of a vSphere 5.5 environment. The vCenter Server Appliance Migration tool is also officially supported, unlike the Fling.
- Do I need to break Linked Mode before starting a migration? Yes, you will need to break Linked Mode before starting your migration. This is the same process as a vSphere upgrade.
- The prerequisites checks failed when running the Migration Assistant, how do I restart this process? Before attempting to relaunch the migration assistant, resolve any errors displayed in the console and/or logs. Only one instance of the Migration Assistant can run at any time and if you try to start another instance, an error message will be displayed.
- I was using a backup agent for my Source Windows vCenter Server SQL Database, how do I backup the vCenter Server Appliance vPostgres DB? With the vCenter Server Appliance, full image level backup using a VADP-based solution is the only supported way to fully backup and restore vCenter Server. It is also important to note that even in a Windows vCenter Server using an External Database, simply backing up the vCenter Server Database is not sufficient to fully restore a vCenter Server and all of its data and configuration.
- I was using an Agent (for example, Monitoring, IDS, backup) on my Source Windows vCenter Server, how does this work after migration? We do not support any VMware or Third Party Agents to be installed on the VCSA. Similar functionality can still be provided through the use of vSphere APIs which customers and Third Party Solutions can consume.
- Can I run the vCenter Server Appliance Migration Tool directly on my Source Windows vCenter Server?
No, the VCSA Migration Tool (UI/CLI) needs to run on a different machine other than the Source Windows vCenter Server because it will be shut down during the migration process and you will lose connectivity to the installer. This is not to be confused with the Migration Assistant which does run on the Source Windows vCenter Server which provides communication between the Source Windows vCenter Server and the vCenter Server Appliance in which the data will be migrated to. - What if my vCenter Server is not part of an Active Directory Domain? This is not an issue as long as the vCenter Server has a valid FQDN.
- If the Source Windows vCenter Server is a self-managed vCenter Server that is going to be migrated, can it be used as a deployment target? No, because there is downtime as part of the migration process and the Source Windows vCenter Server will not be available during this time. To migrate in this scenario, you will need to specify the ESXi host that is currently hosting the Source Windows vCenter Server.
- Why is a temporary IP Address required, I thought the migration process retains the current vCenter Server IP address?
The migrated VCSA will retain the Hostname/IP Address of the Source Windows vCenter Server. However, before the switchover, there is a period in which we export the configuration of the Source Windows vCenter Server and the vCenter Server Appliance will need to be on the network with a temporary IP Address that can communicate with the Source Windows vCenter Server.
- What are the requirements for the temporary IP Address?
The temporary IP Address should be on a routable network that is reachable to the Source Windows vCenter Server.
- What if the default port of 9123 for the Migration Assistant running on the Source Windows vCenter Server is not available?
If port 9123 is not available, the Migration Tool will automatically select the next available port. Customers also have the option of specifying an open port. This information is displayed under the migration settings section of the migration assistant. If the default port is not available, you will need to record the new port and specify it when you start the migration wizard.
- How do I select the proper Database size during the migration?
As part of running the Migration Assistant on the Source Windows vCenter Server, it will not only validate but also collect information about your environment. You will be provided with the current size of your vCenter Server Database and from here, you can either match or increase the configuration based on the future growth of this environment.
- During the migration of my Single Sign-On server to a Platform Service Controller, I cannot see or change the appliance size, why is this?
The Platform Services Controller has a standard deployment size of 2 vCPUs and 2GB of RAM.
- After the migration, when logging into my vSphere Web Client, I noticed a message stating that my vCenter Server has expiring license. I was licensed before the migration, what changed?
Before the migration, you were using a vCenter Server 5.5 license. As part of the migration process, you are now using vCenter Server Appliance 6.0 which uses a new license. Login to the MyVMware portal and update your vCenter Server license from version 5.x to 6.0. After you have upgraded your license, apply the new vCenter license key in the vSphere Web Client.
- The Migration Assistant found an incompatible version of Auto Deploy during the pre-check. How do I get past this?
You will need to upgrade the version of Auto Deploy to version 5.5 before starting the migration.
- What if my vCenter Server has two Network Adapters?
The vCenter Server hostname is resolved to the IP Address. If you have more than one NIC which can resolve this lookup, then you will be prompted to select the IP Address of the NIC you wish to migrate.
- Is there an option to NOT migrate the vCenter Server Performance and Historical data?
Yes, by default only core data (Inventory, config and Alarms) is migrated. Select the check box to migrate all vCenter Server Performance and Historical data (Stats, Events, and Tasks). However, not migrating this data will help reduce the amount of overall downtime.
- How do I calculate the amount of downtime that is needed to migrate the “Source” Windows vCenter Server to the vCenter Server Appliance?
To calculate the estimated amount of downtime needed, see Estimating vCenter Server 5.5 to vCenter Server Appliance 6.0 migration time (2146420).
VMware Virtual SAN: The Technology And Its Future
Introduction
In vSphere 5.0, VMware introduced a new software FCoE (Fibre Channel over Ethernet) adapter. This means that if you have a NIC which supports partial FCoE offload, this adapter will allow you to access LUNs over FCoE without needing a dedicated HBA or third party FCoE drivers installed on the ESXi host.
The FCoE protocol encapsulates Fibre Channel frames into Ethernet frames. As a result, your host can use 10 Gbit lossless Ethernet to deliver Fibre Channel traffic. The lossless part is important and I’ll return to that later.
Configuration Steps
A Software FCoE Adapter is software code that performs some of the FCoE processing. The adapter can be used with a number of NICs that support partial FCoE offload. Unlike the hardware FCoE adapter, the software adapter needs to be activated on an ESXi 5.0, similar to how the Software iSCSI adapter is enabled. Go to Storage Adapters in the vSphere client and click ‘Add‘:
To use the Software FCoE Adapter, the NIC used for FCoE must be bound as an uplink to a vSwitch which contains a VMkernel portgroup (vmk). Since FCoE packets are exchanged in a VLAN, the VLAN ID must be set on the physical switch to which the adapter is connected, not on the adapter itself. The VLAN ID is automatically discovered during the FCoE Initialization Protocol (FIP) VLAN discovery process so there is no need to set the VLAN ID manually.
Enhancing Standard Ethernet to handle FCoE
For Fiber Channel to work over Ethernet, there are a number of criteria which must be addressed, namely handling losslessness/congestion and bandwidth management.
1. Losslessness & Congestion: Fiber Channel is a lossless protocol, so no frames can be lost. Since classic Ethernet has no flow control, unlike Fibre Channel, FCoE requires enhancements to the Ethernet standard to support a flow control mechanism to prevents frame loss. One of the problems with Ethernet networks is that when a congestion condition arises, packets will be dropped (lost) if there is no adequate flow control mechanism. A flow control method that is similar to the buffer to buffer credit method on Fiber Channel is needed for FCoE.
FCoE uses a flow control PAUSE mechanism, similar to buffer-to-buffer credits in FC, to ask a transmitting device to hold off sending any more frames until the receiving device says its ok to resume. However, the PAUSE mechanism is not intelligent and could possibly pause all traffic, not just FCoE traffic. To overcome this, the quality of service (QoS) priority bit in the VLAN tag of the Ethernet frame is used to differentiate the traffic types on the network. Ethernet can now be thought of as being divided into 8 virtual lanes based on the QoS priority bit in the VLAN tag.
Different policies such as losslessness, bandwidth allocation and congestion control can be applied these virtual lanes individually. If congestion arises and there is a need to ‘pause’ the Fiber Channel traffic (i.e. the target is busy processing, and wants the source to hold off sending any more frames), then there must be a way of pausing the FC traffic without impacting other network traffic using the wire. Let’s say that FCoE, VM traffic, VMotion traffic, management traffic & FT traffic are all sharing the same 10Gb pipe. If we have congestion with FCoE, we may want to pause it. However, we don’t want to pause all traffic, just FCoE. With standard ethernet, this is not possible – you have to pause everything. So we need an enhancement to pause one class of traffic while allowing the rest of the traffic to flow. PFC (Priority based Flow Control) is an extension of the current Ethernet pause mechanism, sometimes called Per-Priority PAUSE. using per priority pause frames. This way we can pause traffic with a specific priority and allow all other traffic to flow (e.g. pause FCoE traffic while allowing other network traffic to flow).
2. Bandwidth: there needs to be a mechanism to reduce or increase bandwidth. Again, with a 10Gb pipe, we want to be able to use as much of the pipe as possible when other traffic classes are idle. For instance, if we’ve allocated 1Gb of the 10Gb pipe for vMotion traffic, we want this to be available to other traffic types when there are no vMotion operations going on, and similarly we want to dedicate it to vMotion traffic when there are vMotions. Again, this is not achievable with standard ethernet so we need some way of implementing this. ETS (Enhanced Transmission Selection)provides a means to allocate bandwidth to traffic that has a particular priority. The protocol supports changing the bandwidth dynamically.
DCBX – Data Center Bridging Exchange
Data Center Bridging Exchange (DCBX) is a protocol that allows devices to discover & exchange their capabilities with other attached devices. This protocol ensures a consistent configuration across the network. The three purposes of DCBX are:
- Discover Capabilities: The ability for devices to discover and identify capabilities of other devices.
- Identify misconfigurations: The ability to discover misconfigurations of features between devices. Some features can be configured differently on each end of a link whilst other features must be configured identically on both sides. This functionality allows detection of configuration errors.
- Configuration of Peers: A capability allowing DCBX to pass configuration information to a peer.
DCBX relies on Link Layer Discovery Protocol (LLDP) in order to pass this configuration information. LLDP is an industry standard version of Cisco Discovery Protocol (CDP) which allows devices to discover one another and exchange information about basic capabilities. This is why we need to bind a VMkernel port to a vSwitch. Frames will be forwarded to the userworld dcdb process via the CDP VMkernel module to do DCBX. The CDP VMkernel module does both CDP & LLDP. This is an important point to note – the FCoE traffic does not go through the vSwitch. However we need the vSwitch binding so that the frames will be forwarded to the dcbd in userworld through the CDP VMkernel module for DCBx negotiation. The vSwitch is NOT for FCoE data traffic.
Once the Software FCoE is enabled, a new adapter is created, and discovery of devices can now take place.
References:
- Priority Flow Control (PFC) – IEEE 802.1Qbb – Enable multiple traffic types to share a common Ethernet link without interfering with each other
- Enhanced Transmission Selection (ETS) – IEEE 802.1Qaz – Enable consistent management of QoS at the network level by providing consistent scheduling
- Data Center Bridging Exchange Protocol (DCBX) – IEEE 802.1Qaz – Management protocol for enhanced Ethernet capabilities
- VLAN tag – IEEE 802.1q
- Priority tag – IEEE 802.1p
Troubleshooting
The software FCoE adapter can be troubleshooted using a number of techniques available in ESXi 5.0. First there is the esxcli fcoe command namespace that can be used to get adapter & nic information:
The dcbd daemon on the ESXi host will record any errors with discovery or communication. This daemon logs to /var/log/syslog.log. For increased verbosity, dcdb can be run with a ‘-v‘ option. There is also a proc node created when the software FCoE adapter is created, and this can be found in /proc/scsi/fcoe/. This contains interesting information about the FCoE devices discovered, and this proc node should probably be the starting point for an FCoE troubleshooting. Another useful utility is ethtool. When this command is run with the ‘-S‘ option against a physical NIC, it will display statistics including fcoe errors & dropped frames. Very useful.
Điện toán nhận thức IBM: Chuyển việc khai thác CNTT thông thường tới CNTT biết nhận thức
Chúng ta đang đứng trên thời đại mới của máy tính. Một doanh nghiệp thông minh là một doanh nghiệp nhận thức được sự khác biệt về việc thiết kế, xây dựng và cung cấp các giải pháp công nghệ thông tin (CNTT). Đội ngũ CNTT cần phát huy và giúp đẩy mạnh những định hướng, sáng kiến mới để phù hợp với xu thế. Đây chính là lý do công nghệ của IBM trở nên quan trọng trong việc giúp doanh nghiệp ứng dụng điện toán nhận thức để chuyển đổi công việc kinh doanh của họ. Và việc này cần bắt đầu với việc thay đổi chính nhận thức của chúng ta.
Cho đến nay, doanh nghiệp đã có rất nhiều công nghệ để hỗ trợ trong kinh doanh. Hơn thế nữa, việc áp dụng các công nghệ mới hoàn toàn có thể thuê dịch vụ từ những nhà cung cấp PaaS, SaaS, IaaS, điện toán đám mây… doanh nghiệp không cần quá nhiều người trong việc quản trị và vận hành. Nhưng điều này không làm mất đi những giá trị cốt lõi của đội ngũ làm CNTT, họ mới chính là những người có khả năng nhận thức được xu thế trong thời đại mới – thời đại điện toán nhận thức.
Kỷ nguyên điện toán nhận thức
Chào mừng các bạn đến với kỷ nguyên của điện toán nhận thức, nơi mà tầm nhìn của các chuyên gia CNTT tập trung vào những nhiệm vụ quan trọng của thực tế. Trong thời đại nhận thức, công nghệ không đơn thuần chỉ là công cụ hỗ trợ doanh nghiệp mà nó còn trở thành một người kinh doanh thực thụ, đưa ra được những chiến lược kinh doanh mới. Những kỹ sư công nghệ cũng nên thay đổi cả trong nhận thức để nắm bắt được kỷ nguyên mới, nắm bắt được xu thế trong tương lai.
Theo IDC, những người kinh doanh cho rằng họ cảm thấy chính những người làm CNTT mới là những người sáng tạo kinh doanh nhiều hơn họ. Tuy nhiên, một vài nghiên cứu cũng chỉ ra rằng những người làm công nghệ thông tin cũng ngại thay đổi tư duy. Chính vì vậy, để tiếp cận tới điện toán nhận thức nhanh nhất, thì đội ngũ CNTT cũng cần thay đổi sang nhận thức mới.
Cái tôi trong CNTT
Các lãnh đạo doanh nghiệp cũng đang nhận thức rằng CNTT cần phải được tích hợp chặt chẽ hơn vào chiến lược kinh doanh tổng thể. Để làm được điều này, những người làm CNTT cần phải được doanh nghiệp coi trọng nhiều hơn là cơ sở hạ tầng.
Đội ngũ CNTT cũng cần phải hiểu rằng họ có thể sử dụng công nghệ để thúc đẩy doanh nghiệp mình tiến về phía trước. Nhưng đồng thời, họ cũng phải bỏ cái tôi trong khi làm việc. Thay vào đó hãy đưa ra các ý tưởng mới, các sáng chế mới, đó mới là giá trị cốt lõi để doanh nghiệp có thể tồn tại trong thời đại mới này.
Sự chuẩn bị cho kỷ nguyên điện toán nhận thức
Trong kỷ nguyên điện toán nhận thức, việc phân tích dữ liệu có thể giảm từ vài giờ xuống chỉ còn vài giây, thậm chí là mili giây. Điều này giúp cho doanh nghiệp có những quyết định nhanh chóng theo thời gian thực, kịp thời đưa ra những quyết định phù hợp với chiến lượng kinh doanh và tình hình thị trường.
Chúng ta không thể phủ nhận được sức mạnh của cơ sở hạ tầng CNTT. Máy móc trong kỷ nguyên mới có thể “hiểu, học và phân tích” được mọi dữ liệu. Tuy nhiên để chuẩn bị cho doanh nghiệp của chúng ta tiếp cận tốt hơn với điện toán nhận thức, chúng ta cần chuẩn bị nhiều hơn nữa với một số khái niệm mới mà IBM sẽ đề cập tới:
- Analytics Acceleration
- Data Centric Design
- Innovate with Open Technologies
- Choice for Optimization
- Lock Down while Opening Up
- Controlled Iteration at Scale
Khi chúng ta nhận thức được những khái niệm này, chúng ta sẽ tiến gần hơn với điện toán nhận thức, với các mô hình cộng tác kinh doanh. Cùng với nền tảng Cloud, doanh nghiệp có thể vạch ra một con đường CNTT mới, sáng tạo và nhận thức.
Theo IBM Cognitive Business
Giải pháp ảo hóa Trung tâm dữ liệu
Giới thiệu về công nghệ ảo hóa
Ảo hóa là công nghệ được thiết kế để tạo ra tầng trung gian giữa hệ thống phần cứng máy chủ và phần mềm chạy trên nó. Công nghệ ảo hóa máy chủ là từ một máy vật lý đơn lẻ có thể tạo thành nhiều máy ảo độc lập. Mỗi một máy ảo đều có một thiết lập nguồn hệ thống riêng rẽ, hệ điều hành riêng và các ứng dụng riêng. Có 2 hình thức ảo hóa máy chủ:
- Virtualization Management layer: đây là hình thức ảo hóa ban đầu của máy chủ. Chúng ta thường gọi là “hosted”. Như hình bên dưới thể hiện, chức năng ảo hóa được xây dựng trên một nền OS thông dụng. Một số sản phẩm thông dụng: Microsoft´s Virtual PC, and VMWare´s Workstation.

- Dedicated Virtualization: Hình thức ảo hóa này thường được gọi là “bare-metal”, được chạy trực tiếp trên phần cứng của máy chủ. Vì vậy sẽ giúp sử dụng tài nguyên máy chủ tối ưu hơn là hình thức “hosted”, tốc độ xử lý nhanh hơn. Các sản phẩm thông dụng: ESX, Xen, andn Hyper-V.

Các bất lợi của giải pháp truyền thống
Giảm chi phí đầu tư phần cứng: để đáp ứng những yêu cầu không ngừng về việc triển khai, phát triển các dịch vụ và ứng dụng mới, các tổ chức cần phải tiếp tục tăng thêm số lượng máy chủ. Tuy nhiên, khi càng nhiều máy chủ thì những vấn đề khó khăn lại càng rõ hơn:
- Chi phí tăng: việc mua thêm máy chủ mới sẽ bao gồm chi phí mua máy chủ và các loại chi phí khác: nguồn điện, cooling, không gian đặt máy chủ trong,…
- Hiệu quả đầu tư thấp: với mỗi một máy chủ dành riêng cho một ứng dụng x86 (tải thấp) sẽ làm năng suất hoạt động của CPU chỉ khoảng 5-15%.
- Giảm khả năng quản lý: khó quản lý hơn khi ngày càng nhiều máy chủ và ứng dụng trong một môi trường phức tạp với nhiều loại hệ điều hành, những phần cứng, những loại máy chủ khác nhau.
- Hiệu quả công việc giảm: nhân viên IT sẽ tập trung nhiều thời gian hơn cho việc triển khai máy chủ, cấu hình, giám sát và bảo trì. Vì vậy không còn tập trung nhiều vào các hoạt động, các dự án giúp nâng cao cấp độ hạ tầng thông tin.
Các lợi ích của giải pháp ảo hóa
Giải pháp ảo hóa giải quyết vấn đề về chi phí và năng suất hoạt động của máy chủ bằng việc giảm chi phí phần cứng và vận hành đến 50%, sử dụng tối ưu nguồn tài nguyên thông qua ảo hóa. Đồng thời cũng giúp triển khai các máy chủ nhanh chóng, dễ dàng và tự động quản lý các tài nguyên trong máy chủ tối ưu hơn như:
- Đơn giản hóa việc quản lý hạ tầng bằng cách quản lý tập trung.
- Tự động hóa việc quản lý các nguồn tài nguyên máy chủ giúp các nhân viên IT không còn tốn quá nhiều thời gian vào việc quản lý các máy chủ mà sẽ tập trung vào những ứng dụng và dịch vụ mới mang lại lợi ích cho người dùng và tổ chức.
- Giảm đến 50% chi phí trang bị các thiết bị mới như máy chủ, nguồn, hệ thống làm lạnh… bằng việc tăng hiệu quả hoạt động của các máy chủ hiện tại.
Khả năng sẵn sang cao của giải pháp ảo hóa
IT ngày càng đóng góp quan trọng trong hoạt động của các doanh nghiệp và tổ chức. Việc dừng hoạt động hệ thống IT dù với bất kỳ nguyên nhân nào: bảo trì, backup, lỗi thiết bị, thảm họa thiên nhiên sẽ ảnh hưởng rất lớn đến các doanh nghiệp và tổ chức. Giải pháp ảo hoá sẽ giúp bảo vệ các dữ liệu một cách hiệu quả, có thể lấy lại dữ liệu đã bị mất nhanh chóng và dễ dàng; cung cấp khả năng chịu đựng lỗi, đảm bảo các ứng dụng và dịch vụ vẫn tiếp tục hoạt động khi gặp sự cố; đồng thời cho phép việc khôi phục hệ thống IT sau thảm họa hiệu quả với chi phí thấp hơn như:
Bảo vệ dữ liệu an toàn
Giải pháp ảo hoá đảm bảo việc sao lưu, khôi phục những dữ liệu, ứng dụng, dịch vụ một cách nhanh chóng, dễ dàng và linh động, đáp ứng được các yêu cầu về thời gian và dữ liệu cần phục hồi như:
- Phục hồi dữ liệu nhanh và đơn giản
- Đơn giản hóa việc bảo vệ dữ liệu một cách toàn diện.
- Cho phép thực hiện sao lưu dự phòng tập trung các máy ảo mà không ảnh hưởng đến người dùng, ứng dụng

Tính sẵn sàng cao
Việc phải dừng hệ thống vì chủ quan lẫn khách quan đều gây ra những thiệt hại cho doanh nghiệp. Tuy nhiên các giải pháp về HA (high availability ) hiện nay đều rất tốn kém về chi phí, khó triển khai và quản lý. Với ảo hoá mang lại cho doanh nghiệp một giải pháp giúp hệ thống đạt được độ tin cậy rất cao với chi phí thấp hơn và lại dễ dàng triển khai, quản lý như:
- Cung cấp khả năng sẵn sàng cao (HA) với sự độc lập về phần cứng, hệ điều hành và ứng dụng.
- Không cần ngừng hệ thống khi phải thực hiện những nhiệm vụ bảo trì thông thường: nâng cấp phần cứng, cập nhật hệ điều hành, firmware,…
- Khả năng tự động khởi động lại (restart) khi gặp lỗi.
- Giảm thời gian ngừng hệ thống (downtime) vì những lý do chủ quan: bảo trì, nâng cấp phần cứng, phần mềm, di dời máy chủ,…mà không gây ảnh hưởng đến các ứng dụng và dịch vụ đang chạy trên các máy chủ, cho phép các máy ảo có thể dễ dàng di chuyển qua lại giữa các máy chủ vật lý khác nhau trên những thiết bị lưu trữ khác nhau.
Mô hình Vmotion của VMware
- Ngăn chặn việc dừng hệ thống do các nguyên nhân khách quan như lỗi phần cứng và phần mềm. Môi trường ảo hoá xây dựng sẵn các tính năng hỗ trợ rất hiệu quả khả năng chịu đựng lỗi.
- Giúp khôi phục nhanh chóng khi máy chủ vật lý lỗi. Các máy vật lý được nhóm (group) lại với nhau, tạo thành một khối – cluster, chia sẻ với nhau các nguồn tài nguyên (CPU, RAM, Network..) và giúp chịu đựng lỗi lẫn nhau.

Tính năng phòng chống thảm hoạ

Các doanh nghiệp sẽ tổn thất to lớn khi gặp những sự cố (động đất, bão, hỏa hoạn,…) làm mất dữ liệu, ảnh hưởng lớn đến toàn bộ hoạt động của doanh nghiệp. Vì vậy, những doanh nghiệp lớn thường xây dựng một giải pháp Trung tâm dữ liệu dự phòng và phục hồi dữ liệu sau thảm họa (DR), cho phép khôi phục lại hệ thống sau thảm hỏa. Tuy nhiên, những giải pháp DR hiện tại tồn tại nhiều vấn đề:
- Chi phí đầu tư cao: yêu cầu cấu hình phần cứng ở trung tâm dự phòng (DR site) phải giống với trung tâm chính (Production site).
- Giải pháp phức tạp và mất nhiều thời gian khi khôi phục: cần nhiều công cụ, qui trình khôi phục cho từng loại application, từng loại dữ liệu. Đồng thời quá trình khôi phục cũng tốn quá nhiều thời gian, có thể không đáp ứng đúng yêu cầu về RTO (recovery time objective).
- Khả năng khôi phục không tin cậy: Cần phải thường xuyên kiểm tra, đánh giá lại giải pháp để đảm bảo khả năng khôi phục khi có sự cố. Tuy nhiên, với giải pháp hiện nay thì rất khó kiểm tra do sự phức tạp và mất thời gian cho việc phục hồi
Giải pháp ảo hoá cung cấp một phương án DR với hướng tiếp cận hoàn toàn mới – xây dựng trên khái niệm ảo hóa – nên mang lại những ưu điểm hơn so với các giải pháp hiện nay:
- Phục hồi nhanh: ảo hóa giúp dễ dàng copy, clone các tài nguyên hệ thống nên thời gian phục hồi được cải thiện đáng kể.
- Giải pháp phục hồi sau thảm họa luôn sẵn sàng và đạt độ tin cậy cao vì dễ kiểm tra, đánh giá hơn.
- Giảm chi phí xây dựng một giải pháp Disaster Recovery nhờ sử dụng các máy ảo là phần cứng độc lập, có thể chạy trên bất kỳ những máy chủ vật lý x86 thông thường mà không cần chỉnh sửa, cấu hình lại. Vì vậy có thể sử dụng bất kỳ máy chủ nào ở DR site mà không bắt buộc phải mua phần cứng giống như ở Production site
VMware vSphere 6 – Fault Tolerance hỗ trợ đa vCPU
1. Fault Tolerance đa nhân
Fault Tolerance (FT) đã ra đời từ rất sớm nhưng chỉ hổ trợ 1 vCPU. Tuy nhiên, cách thức kỹ thuật vận hành của FT (Record-Replay) khiến VMware không đa vCPU cho FT.
Sau nhiều năm nghiên cứu Fast Check-Pointing, SMP-FT mới hỗ trợ cho các VM với 4 x vCPU và 64 GB RAM.

Hình 1: FT với VM chỉnh và VM thứ cấp
Với Fast Check-Pointing, VM chính và VM thứ cấp đồng thời thực thi cùng một luồng các dòng lệnh khiến việc đồng bộ trở nên nhanh hơn. Nếu độ trễ của mạng (network latency) cho tính năng FT trở nên quá cao để các VM có thể đồng bộ, VM chính sẽ bị ép chậm lại ở một điểm lệnh mà VM thứ cấp có thể bắt kịp.

Hình 2: Cơ chế Record-Replay giữ VM thứ cấp ở một “virtual lockstep” với VM chính
2. Đặc điểm và giới hạn của SMP-FT
Vẫn có một số giới hạn đối với SMP-FT như
- Một host vật lý bị giới hạn hỗ trợ SMP-FT cho 4 VM hoặc 8 vCPU tổng cộng. Giới hạn này bị áp dụng cho cả VM chính và VM thứ cấp trên host.
- Với VM được cấu hình SMP-FT, vẫn chưa cho phép thêm nóng CPU và RAM.
- Các VM chạy SMP-FT không hỗ trợ trong Storage vMotion, vCloud Director, vSphere Replication, VSAN/vVols và vFlash.
- Card NIC 10Gbps được yêu cầu cho tính năng SMP-FT.
Với cơ chế kỹ thuật mới, SMP-FT sẽ tạo ra 2 VM tách biệt hoàn toàn ở 2 host, bao gồm cả datastore.
- Điều này cho phép bảo vệ VM không chỉ khi xảy sự cố ở host mà còn khi xảy ra sự cố ở datastore với zero downtime.
- Ngoài ra, các yêu cầu cũ về phải sử dụng chung một hệ thống lưu trữ (shared storage) và tạo VM với Eager Zero Thick cũng không còn cần thiết. SMP-FT đã hỗ trợ cho local disk hay bất kỳ dạng storage nào khác.
- VM thứ cấp vận hành cũng sẽ tiêu tốn I/O lên hệ thống lưu trữ gần như VM chính. Cần cân nhắc thông tin này khi thiết kế.
- Ngoài ra, cơ chế mới của SMP-FT cũng sẽ tiêu tốn hơn về năng lực của host, có thể lến đến 10%-30%.
Ngoài ra, các tính năng HA Cluster và DRS cũng được nâng cấp để nhận biết và luôn đảm bảo cặp VM chính và thứ cấp đang chạy FT được chạy trong hệ thống các host.
Nên nhớ, FT không thể thay thế được các kỹ thuật cluster khác hoạt động ở lớp cao hơn như Microsoft Cluster (lớp OS) hay Server Load Balancing (lớp Application).
VMware vCenter Site Recovery Manager

VMware vCenter Site Recovery Manager
Automated Disaster Recovery Orchestration
1. Site Recovery Manager là gì ?
vCenter Site Recovery Manager là giải pháp hàng đầu về quản lý phục hồi sau thảm hoạ (DR). SRM cung cấp tính năng đặc biệt cho phép tự động sắp đặt và kiểm tra phục hồi không gây gián đoạn (non-disruptive) các hoạt động của hệ thống tại trung tâm dự phòng.
SRM có thể sẵn sàng tích hợp với vSphere Replication và hỗ trợ tất cả những sản phẩm sử dụng công nghệ sao lưu nhân bản array-based của tất cả các đối tác lớn của Vmware
SRM làm giảm chi phí vận hành qua tính năng cho phép tự động kiểm tra thường xuyên phục, liên tục kế hoạch phục hồi hệ thống tại trung tâm dự phòng. Đảm bảo khả năng phục hồi nhanh chóng, chính xác, toàn vẹn dữ liệu, đáp ứng được linh hoạt nhu cầu thay đổi của doanh nghiệp trong hoạt động kinh doanh, đồng thời loại bỏ được sự phức tạp trong quá trình vận hành DR của IT.
2. vSRM làm việc như thế nào ?
VMware vCenter Server™. Site Recovery Manager được triển khai đồng thời ở cả hai trung tâm chính và dự phòng cùng với vCenter Server.
Replication. SRM yêu cầu một công nghệ nhân bản cở bản để sao chép những máy áo hóa chứa dữ liệu (VM) từ trung trâm chính (Production Site )sang trung tâm dự phòng (Recovery Site).
vSphere Replication. Một trong những công nghệ nhân bản dựa trên ảo hóa của VMware cho phép VM-Centric tạo ra những bản sao lưu độc lập với mục tiêu tùy chình điểm phục hồi (RPO) hoặc nhiều điểm điển phục hồi. vSphere Replication đã bao gồm trong hầu hết các phiên bản của vSphere Edition mà không phát sinh thêm bất kỳ khoản chi phí nào cho license.
Array-based replication. SRM sẵn sàng tích hợp với những sản phẩm lưu trữ dựa trên công nghệ array-based replication của hãng thứ 3 thông qua Storage Replication Adapter (SRA).
VMware NSX – Network Virtualization (Phần 1)
Phần 1: Giới thiệu
Với sự phát triển, công nghệ ảo hóa ra đời đặc biệt là ảo hóa máy chủ đã đem tới những siêu lợi ích về đơn giản hóa cơ sở hạ tầng, tăng cao khả năng hoạt động cũng như tận dụng triệt để nguồn tài nguyên và nhiều lợi ích khác. Không đừng ở đó, VMware vừa cho ra đời sản phẩm VMware NSX giúp ảo hóa cả hạ tầng network.Nếu đối với bộ sản phẩm vSphere giúp thu gom các tài nguyên vật lý máy chủ (Server Hypervisor) như CPU,RAM,NIC…để cung cấp cho các máy ảo (VM) thì nay với NSX với Network Hypervisor/Network Virtualization Platform là 1 bộ chi tiết các thiết bị ảo như Switch, Router, Firewall, Balancer..v..v. cung cấp dịch vụ mạng (thiết bị mạng) từ lớp 2 tới lớp 7.
 H1: Mô hình tương quan giữa ảo hóa máy chủ và ảo hóa mạng
Với việc ảo hóa hạ tầng mạng, thì việc thêm, xóa, thay đổi các thiết bị nay chỉ với vài click chuột đơn giản mà không cần setup phần cứng phức tạp. Đây sẽ là bước ngoặt cho các hệ thống mạng trong tương lai.
1. Thành phần trong VMware NSX:
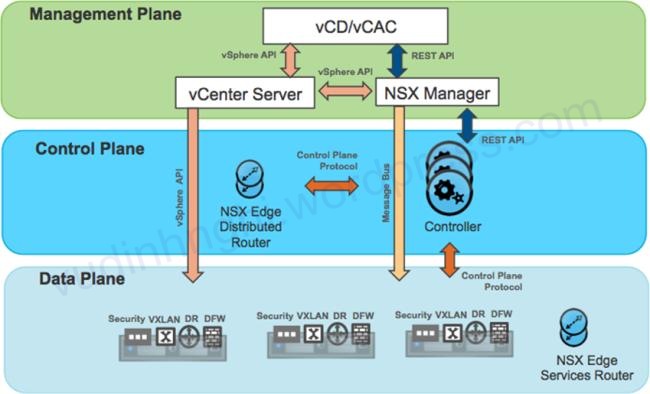
VMware chia mô hình VMware NSX thành 3 phần: Management Plane, Control Plane và Data Plane.
a. Management Plane (Bảng quản lý)

NSX Manager là giao diện quản lý web-based cho phép quản trị viên có thể thêm bớt, giám sát hệ thống mạng ảo, tương tự như snapshot VM của vSphere, NSX có khả năng snapshot trạng thái các thiết bị ảo cũng như backup/restore.

b.Control Plane (Bảng điều khiển/kết nối)
NSX Controller tiếp nhận các API của vSphere và các Hypervisor khác (Xen, KVM…) và liên lạc với vSwitch, Gateway để forward thông tin.
Cần tối thiểu 3 NSX Controller trong 1 Controller Cluster để đảm bảo tính sãn sàng và trong NSX Controller (vẫn có quyền cài 1) chỉ forward các thông tin liên quan Control Plane, không chứa thông tin của Data Plane.
NSX Controller cũng liên lạc với các NSX Egde (Brigde,Gateway).

c. Data Plane
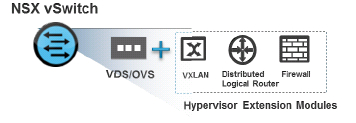
Data Plane gồm có NSX vSwitch sẽ liên lạc trực tiếp với Control Plane. Với môi trường sử dụng vSphere thì NSX vSwitch dựa trên VDS ( Virtual Distributed Switch) và Open vSwitch cho Hypervisor khác.
vSwitch hỗ trợ các tính như Routing, Firewall, VXLAN, Balancer…v.v.v.
Tuy NSX hỗ trợ cho cả các Hypervisor khác (KVM, Xen) nhưng thực tế vẫn có sự khác biệt giữa 2 mô hình : thuần vmware và thập cẩm.
* Mô hình đa Hypervisor (Xen/KVM/ESXi):
Với mô hình này lớp Control Plane hay rõ hơn là Controller phải là thiết bị vật lý và NSX Gateway cũng là thiết bị vật lý.
Hiện nay Hyper-V vẫn chưa được đề cập tới trong VMware NSX.

*Mô hình thuần VMware (ESXi only)
Ơ mô hình này, được hỗ trợ từ A-Z các chức năng ảo thiết bị như Controller, NSX Edge và VDS của VMware
Lúc này NSX Manger sẽ cùng làm việc nang hàng với vCenter
Ở bài tới, sẽ đi sâu hơn vào các thành phần của VMware NSX
Những tính năng mới trong VMware vSphere 5.1
- Nâng cấp cấu hình tối đa cho một máy ảo – Với VMware vSphere 5.1, các máy ảo có thể được trang bị tối đa 64 vCPUs (nâng cấp so với 32 vCPU của vSphere 5.0) và 1TB vRAM (giữ nguyên so với vSphere 5.0).
- Format mới cho các máy ảo – Với format mới (Virtual Machine Version 9), các máy ảo có thêm một số tính năng như nâng cấp cấu hình tối đa (đề cập ở trên), bổ sung một số metrics khi đánh giá hiệu năng CPU và một số cải tiến về đồ họa khác.
STORAGE (Khả năng lưu trữ)
- Nâng cao mức độ linh hoạt và hiệu năng sử dụng không gian lưu trữ của giải pháp VDI – Định dạng đĩa mới nâng cao mức độ cân bằng giữa hiệu năng sử dụng không gian lưu trữ với tốc độ truy xuất đĩa (I/O throughput) đối với môi trường máy trạm ảo (virtual desktop).
- vSphere Distributed Switch – Một số bổ sung như Network Health Check, Configuration Backups and Restore, Roll Back and Recovery, và Link Aggregation Control Protocl (LACP) cung cấp các tính năng networking cao cấp phù hợp với môi trường doanh nghiệp cũng như môi trường cloud.
- Hỗ trợ Single-root I/O virtulization (SR-IOV) – SR-IOV tối ưu hóa hiệu năng cho các ứng dụng phức tạp.
AVAILABILITY (Độ sẵn sàng)
- vSphere vMotion – Thực hiện vMotion mà không cần shared storage (là một yêu cầu bắt buộc với vMotion ở các vSphere phiên bản trước)
- vSphere Data Protection – Dựa trên nền tảng kiến trúc của giải pháp Avamar _ EMC, vSphere Data Protection mang đến một giải pháp đơn giản và hiệu quả cho việc backup và recovery các máy ảo. Người quản trị có thể backup virtual machine ra tủ đĩa mà không cần cài đặt agent trên máy ảo. vSphere Data Protection thay thế cho tính năng vSphere Data Recovery ở các phiên bản vSphere trước đây.
- vSphere Replication – Cho phép replicate các máy ảo thông qua hệ thống mạng LAN / WAN với giao diện quản lý đơn giản và thời gian thực hiện dưới 15 phút.
- VMware Tools – Các máy ảo nếu có VMware Tools đã được upgrade lên phiên bản tương ứng với vSphere 5.1 thì những lần upgrade VMware Tools về sau sẽ không cần phải reboot máy.
SECURITY (Bảo mật)
- VMware vShield Endpoint – Cung cấp giải pháp bảo mật đầu cuối với tính năng đơn giản, hiệu quả và tương thích với cloud. vShield Endpoint tương thích tốt với các giải pháp bảo mật từ hãng thứ ba, qua đó giảm thiểu việc phải cài đặt agent lên các máy ảo, offload các tác vụ bảo mật từ máy ảo thông thường sang các máy ảo dedicate cho các tác vụ này, cũng như tối thiểu hóa sự ảnh hưởng đối với hiệu năng máy ảo khi thực hiện scan.
AUTOMATION (Tự động hóa)
- vSphere Storage DRS và Profile-Driven Storage – Các tính năng này (đã có ở vSphere 5.0) được tích hợp với VMware vCloud Director nâng cáo hiệu năng sử dụng storage cũng như nâng cao khả năng tự động trong môi trường private cloud
- vSphere Auto Deploy – Giới thiệu 2 phương pháp mới để triển khai / cài đặt vSphere host
MANAGEMENT (Quản lý với vCenter Server)
- vSphere Web Client – sẽ được sử dụng như giao diện chính để kết nối đến hệ thống vSphere. vSphere Web Client có thể chạy tốt trên các trình duyệt Internet Explorer và Firefox. vSphere Client sẽ dần được thay thế bởi công cụ này.
- vCenter Single Sign-On – Chỉ cần một lần log-in để có thể truy cập và sử dụng các tính năng của vCenter
- vCenter Orchestrator – Sử dụng các công cụ tùy biến workflow linh hoạt, vCenter Orchestrator đơn giản hóa quá trình triển khai / cài đặt trên vCenter Server. Những thiết kế workflow mới mang lại giao diện thân thiện, dễ sử dụng và đặc biệt là có thể chạy trực tiếp từ vSphere Web Client.
